Sunday, September 30, 2012

My Wedding Shower Favor

Part of the fun of going to a shower you did not plan is seeing the fun shower favors people come up with.  This favor was made by my old roommate Andrea for my Fresno shower.  I have to say to a normal bride the favors were cute and crafty.  For me they were amazing!!!  She not only kept the colors for the wedding, but went a step further and added my "C" from the invites.  It was so fun to get there and see this cute little purse filled with chocolate.  I had to take the extras home and give them to my crafty friends who could not wait to try to make one for themselves :)  Thanks Andrea!!!
For more of Andrea & Nicole's fun crafts check out their blog at http://www.teehee4two.blogspot.com/

Saturday, September 29, 2012

My Wedding Thank You Card

With all of the showers I knew I would need thank you cards.  I knew I would not come up with a better idea for the wedding thank you cards so I was going to mass produce all at once.  I wanted to make them simple & light, but yet again fit the theme.  So this is what I came up with!  I kept the ribbon and the scalloped C in the center.  Then I used the large packs of cards that came with envelopes (to help cut on the cost). Then I used the same brown to make the ribbon pop.  I have to admit that I did not sit down and perfectly center each card before I glued it.  I actually sat in the back seat of my parents Jeep as we drove down to see my grandparents.  It was an adventure as I unloaded myself at each stop!  But by the time we hit Magic Mountain (where my grandparents live) I had finished all 300 thank you cards.

Friday, September 28, 2012

My Wedding Save the Date

In celebration on my upcoming one year anniversary.  I thought it would be fun to flash back to last year and every day blog a piece of my wedding set.  Let me start with I really wanted the brown, cream and light blue.  Once my heart was set on these colors I knew I had to have them!  Sadly as I began to search stores for invite sets NONE had brown and baby blue, they were all brown and teal.  So I decided to make EVERYTHING on my own.  My poor Cricut got a work out in the fact that we invited 350 people (so that is about 150 addresses) crazy I know.  

Since today is the first of the blog set I am going to start at the beginning with the Save the Date!  This is where the theme started!  I wanted to have ribbon and paper with the same theme all the way through.  I started with these stamped brown c's on the blue Cricut scalloped circle.  After this I designed the rest of the save the date around it :)  

I hope you enjoyed today's post and for those of you who went I hope these posts will bring back fun memories!!!

Thursday, September 27, 2012

Dad's Blog

What a day!  I have been working on helping my dad upload, label and caption all of his amazing photography.  It has been fun looking at all of the pictures for sure!  For some great pictures from around (that will make you sad you are not there) check it out  http://drewmeyersphotos.blogspot.com/.  Here are a few for fun . . . 


Monday, September 24, 2012

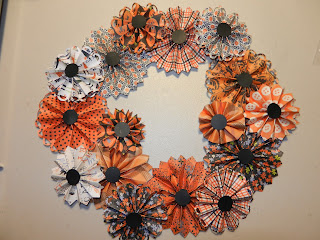
Halloween Wreath

I had so much fun making this wreath!  I used a multitude of Halloween colored papers and created this fun wreath.  I cut the large die strips in smaller pieces.  This helped to create the different sizes in the rosettes.  I cant wait to make another one for the next holiday!!!!!
Stampin' UP!
Die: Rosette (cut in 2" & 1 1/2" Strips)
Punches: 1 3/8" circle, 3/4" circle


Friday, September 21, 2012

Women's Ministry Craft Day

 Hi all of my Stockton Friends!  Lincoln Presbyterian's Woman's Ministry is putting on a craft day and we would love for you to join us!  
Saturday October 6, 2012
9:30am-11:30am
At Our Lincoln Douglas Campus
600 Douglas Rd. Stockton
RSVP to ASAP hold your space!

Stampin' Up!

Die: Rosette (cut in 2" & ! 1/2" Strips)
Punches:  1 3/4" Circle, 1 3/8" Circle, 3/4" Circle,
Ornament, XL Decorative Label
Stamps: Tags Till Christmas, Delightful Decorations
Sizzix:
Christmas Embossing Folder


Wednesday, September 19, 2012

Halloween Flowers

On Saturday i am teaching a wreath class. I had extra rosettes so I wanted to do something with them. For one of my bridal showers a friend put black and white paper in the vases and filled them with punk and white daisies. So today I took the flowers out of the case and I filled it with the leftover rosettes attached to a stick. I made the flowers using the SU! rosette die :)

Tuesday, September 18, 2012

Prayer Journals

I love making journals for my small group to use for the lesson.  This time we were given a little workbook for our lessons, so I though we needed a little (purse sized book) for our prayer requests.    I started with the little journals (pictured below) and covered the journal with red paper.  Then I gave it a fun strip of black and white paper.  Then I built a rosette, using the Tim Holtz die cut.  (Note: if you are using the Big Shot you will need an Extender Space Platform from Sizzix.)  I hot glued the rosette on the front.  Then I punched out an elegant butterfly and stamped the love on it.  

Stampin' Up!
Punches:  Elegant Butterfly
Stamps: Tiny Tags, Blessings from Heaven,
Trust God (stamped inside front page)
Tim Holtz: Rosette Die


Monday, September 17, 2012

Butterfly Treats

I got this idea from the Stampin' with Heather.  I loved it for a simple treat. My small group is starting tomorrow and I wanted to give everyone a fun treat, so here it is.  It was so simple and super cute!  I die cut the butterfly and then simply wrapped the Hershey Nugget in paper and tied it onto the butterfly.  If it slips you can use a sticky dot to help hold it on.
Stampin' Up!
Die: Beautiful Butterfly

Thursday, September 13, 2012

Our Wedding Photo Book

I have been crafty in a different way this week.  I was making a Shutterfly gift album of our wedding.  It was a lot of fun, but I did miss the cutting and adhering of a REAL album for sure.  After this I cant wait to try the new MDS2 trial I downloaded from Stampin' Up!  It would be so much fun to have added embellishments I know already!!! 

Tuesday, September 11, 2012

Memory

This is just another fun way for kids to play with stamps ;)
Stampin' Up
Stamps: Great Sport or Papillon Potpouri

Monday, September 10, 2012

Go Fish

I just got back from Vegas and have not got back into the crafting mode, so I thought I would share with you a past project.  This Go Fish was from one of my kids classes.  It was fun to make a holiday Go Fish game.  This game could be made with any stamp set for any occasion.
Stampin' Up
Stamps: It's a Wrap Holiday (retired)

Friday, September 7, 2012

Emboss Me Ribbon

This was just a fun simple card I made for the Embossing class!  Have a great Weekend!
Stampin' Up!
Stamps: Blue Ribbon

Thursday, September 6, 2012

September Classes


SEPTEMBER Schedule!!!
ADULT- Perfectly Preserved Card Class
Cost -$15.00-  September 12th 6:30-8:30pm @ Panera
We will be making four cards based on the
Perfectly Preserved stamp set and framelits.  This is a great time to come and learn about the do’s and do not’s of framelit work!


 ADULT PROJECT- Fall Rosette Wreath
Traditional
Bright

$30 Halloween Wreath (Choice between Traditional and Bright)
We will be making a basic Halloween wreath with rosettes and then adding buttons, bows and bling!!!   (If you are not a Halloween person you can bring your own paper but it is the same cost)
Saturday September 22nd at 10:00am-Noon or when you are done @ Kristin’s House
We will be making a door wreath using the rosette die cut.  I will be making a fall wreath, but you can make any theme if you want to bring your own paper ;)  Lots of options out there: Birthday, Halloween, Christmas . . . !!!

*** To hold a spot in a class please RSVP to Kristin at kristinsalwayscraftin@yahoo.com ***
If you are not able to come to the card classes you can buy the finished cards made for $5 plus the cost of the class. 
If you are unable to join us for the Project class you can buy the project assembled for $10 plus the cost of the class 

Wednesday, September 5, 2012

Happy Birthday Dad

Happy Birthday Dad!!!  We had a celebration for my uncle and dad the other day.  It was the first in years so it was a lot of fun.  This was my dad's Birthday card.  I wanted to do something that was simple and would match the wrapping.  This card sums my dad up to a T.  What you see is what you get ;) and it is all about being on the boat! 

Stampin Up!
Stamps: Oval All (retired)
Punch: Small Oval


Tuesday, September 4, 2012

Happy Birthday Uncle Jack

There is so much to day about this card!  Lets start with Happy (posted a day late) Birthday uncle Jack!!!  Every week my aunt is so good about bringing us FRESH eggs from Uncle Jack's chickens.  So in honor of the chickens I started my hunt to find a chicken punch art I had pinned on Pinterest.  Once I found it the fun began. I decided to have a blue card for the sky.  Then I added some green grass that I sliced to give it texture.  After that I attached my chicken (detailed directions below). To top it off I added a embossed sediment next to my chicken to make it special for Jacks Birthday!  I hope he likes his sleepy (from too much cake) chicken card!
Stampin Up!
Stamps: Bring on the Cake
Punches: Lg Scalloped Circle, 1/2" , small heart,
Circle, Little Labels set (square- for beak),
Itty Bitty Shapes set (circle- black of eyes), (cross- for feet)
Like I said I got the orginal punch chicken from Pinterest and from there I made a few changes to make her mine ;)
I started out by punching out a yellow Lg Scalloped Circle.  From there I punched out 2 small hearts for hands.
Then it was onto the eyes.  I used the 1/2" punch for both the white eye balls and the yellow eyelids (that I cut in half).
To get the black of eyes I used the circle from the  Itty Bitty Shapes set and then covered it with my previously cut
circle eye lid.  Then it was time for a beak.  You could cut out a small square if you wanted, but my goal  was to use
all punches so I punched the orange using the square from the Little Labels set.  Last but not least I used the
Itty Bitty Shapes set cross to give me cute little feet to look like he was walking in the grass.  I wanted to
give her a bow, but I know my uncle Jack would have said that the bow was a little girly for him.


Monday, September 3, 2012

Happy Birthday Margaret

I wanted to make a birthday card that did not scream BIRTHDAY.  This card was it!!! There is just something about zebra print that screams Happy Hour ;)  I started by backing the project with my zebra printed paper.  From there I tried to figure out how I was going to use this stamp set.  Then it came to me.   I simply stamped my drinks on a white piece of paper and mounted it on the card.  To finish it off I stamped the sediment and then punched it out.  So that it would stand out I added dimentinals behind it ;)  I hope she likes it as much as I did.  I also made one for my friend Jenna's Birthday later this month because she is living in Chico and I still think it is funny that Chico and drinks go so well together ;)
Stampin Up!
Stamps: Happy Hour
Punch: Decorative Label

Sunday, September 2, 2012

Happy Birthday Jake

Happy Birthday Jake;)  To add to the Dodgers blue theme of the kids here is Jake's card.  I wanted to make it kid fun so I used the pennant builder to make the corner.  I used puff dots to pop them up off the white card.  Then I stamped the Wish big to make it a little more birthday like ;)  Simple and clean, just like I like it!
Stampin Up!
Stamps: Word Play
Punch: Build a Pennant 

Saturday, September 1, 2012

Happy Birthday Megan

I have to start by saying sorry to all who look at this blog often.  September is quite the birthday month for my family and friends.  So with that said tomorrow is my little cousins Megan & Jake's Birthdays!  Since they share a birthday (and are siblings) I feel it is only fair that Megan (the older) get her post first.  After seeing a post on Facebook about Megan asking her dad for a orange shirt as she watched the SF Giants game I had to mess with dad a little and make the kids gifts Dodgers blue :)  Ok so at 3 she will never know why everything is blue but you have to love my family and our jokes.  So like I said I wanted to make the card blue so I started with a blue background embossed with the chevron folder.  Once that was done I started to work on the rest of the spinner card.  I started with the Take a Spin stamp and punched it out with the 2 1/2" circle punch.  Once that was done I cut a 3" piece of blue and then backed it with a piece of white.  Now to attach the spinner.  I made a small hole in the center of the circle and then pit the spinner through.  I wanted it to stand out so I used dimentinals to pop it up.  Once I was done I added the pink on the birthday part to make it a little more Megan.  To prove a card is never complete after I took the picture I decided it needed bling so I added pearls to each corner of the blue backing (not the card).  I hope she has fun with the spinner and her blue gift!!!
Stampin Up!
Stamps: Take a Spin
Punch: 2 1/2" Circle
Big Shot: Chrvron Embossing folder