Monday, February 25, 2013

Whale Shower Thanks!

Thanks a Ton for sticking around to see the whole set :)  Here is the thank you card we made for her to send out after the shower!
Stampin' Up!
MDS, Oh Whale (brush set)


Sunday, February 24, 2013

Whale Gift Card

We wanted to make a simple card to go with the theme for the gift.  So here it is :)  There are many things I would like to have changed or added but by this time we were crunched for time.  

Stampin' Up!
Stamp: Oh Whale, Petite Banners
Die: Whale Clearlit, Petite Banners

Saturday, February 23, 2013

Cupcake Toppers

For the ocean shower they wanted to have cupcakes for dessert.  So we wanted to stay with the same creatures as the other decorations so we made cupcake toppers.  We started with just the creatures and quickly realized they would get lost on the top of the cupcake.  So we backed it using the 2 3/8" Scalloped Circle.  This helped the creatures to stand out :)

Stampin' Up!
Punches: 2 3/8" Scallop Circle
Cricut
Life is a Beach- Animals 1.47" Height

Thursday, February 21, 2013

Ocean Banners

We needed a few banners for the party.  The first was one for the gift table, then a theme and then the baby's name.  This job took both the Cricut and the Big Shot ;)  We started with the pennants and embossed them with the polka dot folder.  Then we added the rosettes and Gypsy font letters.  Oh do I love these letters!!!  Then it was time for the sea creatures.  We were not sure if the creatures would match onto the banner but looking at them in the picture they look pretty good.  Tomorrow come back for more ocean fun!  

For the Gift Table!
Stampin' Up!: Polka Dot folder
Tim Holtz: Rosette Die
Cricut: Gypsy Font- 1.47"
Country Life- Pennant; Zig Zag 5.71"
Life is a Beach- Animals 1.12" Height
Showered with Love- Theme Banners

Wednesday, February 20, 2013

Ocean Favors

These came out even better than I thought they would.  I thought the pillow box needed to embossed but I was not sure with what.  Then I saw my chevron folder staring me down :)  Look how it gives the boxes movement.  Then we attached the 5 different sea life creatures on the different boxes (evenly split).  We are going to fill them with Swetish Fish.  I know how cute!!!  
Stampin' Up!
Die: Chevron Folder, Pillow Box
Cricut:
Life is a Beach- Animals 1.47" Height

Monday, February 18, 2013

Tamra's Memorial

I don't usually share family projects, but today I am in honor of my very artistic Aunt.  I was asked to design her program for the memorial (on her birthday-today).  I wanted it to be something that screamed Aunt Tam!  I stressed and stressed and  then I began designing it on MDS.  First this made it easy to send to my cousin in the Bay Area to be printed!  Second it allowed me to use her own art as the background (with 1 click)!  I just had to share my aunts art with everyone one last time :)  Happy 70th birthday Aunt Tam!  You will be missed!!! 
This will be folded in half and will become the front and back covers
This will be the inside of the program. The piece of art on the bottom left is her
Rose painting that became the background for the whole program.
The original hangs on her oldest daughters wall. 

Wednesday, February 13, 2013

Valentines Day Surprise

Hi Everyone!  I am sorry I have not posted lately.  I have been working on 2 showers, a scrapbook and my aunts memorial program and like always nothing is done.  I will be finishing a whale themed baby shower this weekend and will have lots to share soon.  For today I had to share my friends teacher gifts for Valentine's Day.  I have seen the ideas online so it was fun to see this idea in person.  Oh and I must say they are good :)  Thanks Tonya for letting me share your yummy treat!

Wednesday, February 6, 2013

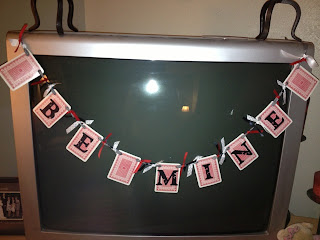
Be Mine

I have seen a few banners like this one on Pinterest so I wanted to make on of my own for Valentines Day. It was so simple. I started with the hearts from an old deck of cards.  This deck was missing cards so it was a perfect recycled project.  I used my 3 hole punch and punched the corner of the card at the bottom of the punch. Then I flipped it over and punched the other corner in the same way. Repeat for each card. Now that you have all of your cards ready Lay them out on a table and string them onto your ribbon.  Once they are all on space them apart so there is enough room for 3 to 5 ribbons or pieces of yarn in between.  I then used my Cricut to cut out the words BE MINE.  I found they needed to be cut in a height of 2 inches.  Attach the letters, then hang it up and you are done ;)  Oh ya if you flipped the banner over it is the paying card side.  Like I said I was missing cards so I mixed up the numbers and centered them between the valentine couple (King and Queen).  It would be the perfect banner for a valentine themed game night!

Cricut: Gypsy Font

Tuesday, February 5, 2013

Small Group Journal

I wanted to give my small group something special for their notes for our new study.  I wanted there to be room to write notes as well as prayer requests.  I started out with the backing paper and then saw the framelit.  As soon as I remembered I has it I had to play with scraps and that is how this cover came to be :)
Stampin Up:
Punches: XL Decorative Label
Die: Beautiful Wings

Monday, February 4, 2013

A Merry MDS Christmas

I realized I posted our Christmas book and not our Christmas card.  So here it is.  I had fun with my MDS2 to create a Christian Christmas card.  I did not want Happy Holiday's so after searching everywhere I learned Costco has a blank Christmas card.  It is there for you to create your own and print from them!  I was so excited so I began to create my card and after looking through pictures this is what I ended up with ;)

Sunday, February 3, 2013

Heart Plant

My in laws were in town for dinner on their way home to AZ.  I wanted to get his mom flowers to celebrate their anniversary but I knew they would never make the drive.  When I was at Trader Joe's they had theses cute plants so I had to pick one up!  I added a simple Happy Anniversary sign to the center and I was done. 

Stampin' Up!
Stamps: Memorable Moments
Die: Label  Framelits

Saturday, February 2, 2013

Love Notes

I have seen a lot of great ideas for leaving notes to your loved ones for the days leading up to Valentines Day. So I thought I would make my own 14 reasons I love you for my husband.  I cut out the basic shape with a label framelit.  Then I stamped the day in the center and sponged the edge with red :)  I just love it!

Stampin' Up!
Stamps: Memorable Moments
Die: Label  Framelits

Friday, February 1, 2013

Christmas Book 2012

I finally got around to binding this years worth of Christmas Cards.  This year I designed my own Christmas Card on MDS2.  So I really wanted to make the cover match our Christmas Card ;)  I had a lot of fun with both Stampin Up and Cricut for this project.  Then I got to top it all off with a bunch of ribbons.  I cant wait for next Christmas to come!
Stampin Up:
Stamps:  Come to Bethlehem
Big Shot: Label Framelits
Cricut Letters