 |
| Stampin' Up! Stamps: It's a Wrap, Bring on the Cake Punch: Small Scalloped Circle |
Monday, April 30, 2012
Happy Birthday
This was my favorite of the set so I saved it for last ;) Though the stamps not being perfectly straight bothered me a little I loved the colors. If you would like them to be streight you might want to cut each out and attach each to the card. I used the Happy Cake Day stamp in each color on the card. Later I made one with only one color and it was cute too! To add something to the card I stamped Happy Birthday stamp and colored it to match the card. When I was done coloring it I punched it using the small scalloped punch and attached it using a dimensional ;)
Sweet Baby
I wanted to use the Hershey Nuggets again so I used the bitty box to create a little treat box. After that I assembled the bitty box with a tough tape. Then I stamped Sweet Baby in green on the yellow paper 5 times. On one I punched it out using the oval punch, the rest were cut in strips. I attached the strips to the candy and the oval one to a green scalloped oval on the top.

 |
| Stampin' Up! Stamps: It's a Wrap Punches: Small Oval, Small Scalloped Oval Die Cut: Itsy Bitsy Box |
Saturday, April 28, 2012
Chocolate ALWAYS Helps Me Feel Better
I loved this little baggie of fun! I mean who does not need a little chocolate "love" when they are sick?!? I wanted to say with the "chocolate" colors so I stuck with browns. I started with 4 Hershey Nuggets and 4 strips of cream paper. On each paper I stamped the Get Well Soon stamp in brown. When I was down I attached them to the wrapper of the Hershey Nugget and put them in the bottom of the bag. Then I folded a natural piece of paper over the top and stapled it closed. To hide the staple I used the small scalloped circle in espresso and the 1 3/8" circle in natural. I topped it off with the Hello stamp as my greeting ;)
 |
| Stampin' Up! Stamps: It's a Wrap, Elementary Elegance Punch: Small Scalloped Circle, 1 3/8" Circle |
Friday, April 27, 2012
Thanks SO Much
I found the original card on Split Coast Stampers and then changed it a little ;) I started with the blank card and added a piece of yellow we scalloped on the top using the Scalloped Boarder punch. Before we attached the yellow we attached the ribbon behind to save on the ribbon. To save more ribbon I took a scrap and tied it like a knot to the line of ribbon. Then I used the green to stamp 4 of the Thanks SO Much stamp. To make the stamps look straight I trimmed around 3 and attached them to the card. To finish it off I colored and cut around the Thanks SO much part and used a dimensional to puff it up!
 |
| Stampin' Up! Stamps: It's a Wrap Punch:Scalloped Boarder |
Wednesday, April 25, 2012
Barbra & Jaden's Birthday
These cards were were designed for my brothers Mother in Law and Sean's nephew. I was so excited to use my new cupcake stamps and punch!!! I had a lot of fun mixing and matching. I first stamped the cupcake holder and then punched them out and attached them flat to the card. Then I stamped and punched the frosting. That was attached with a dimensional dot ;) Then I finished them off with a cherry, candle and ribbon. This card will be part of my cupcake class for sure now ;)

 |
| Stampin' UP! Punch: Build a Cupcake Stamps: Create a Cupcake |
Tuesday, April 24, 2012
It's a Wrap class
I have had this set for a while. I have to admit it was one of the first sets I purchased. Sadly it has sat on my shelf for a while until I finally pulled it our for Erin's Matchy Matchy shower. By the time I realized how fun this set was it went on the soon to be retired stamp list. So I wanted to do a class before people could not buy the set any longer. Over the next week I will post individual projects and the details, but for now I would just like to invite you to the class!!!
Wednesday April 25, 2012
6:30pm-9:00pm
Stockton Panera (Trinity Parkway)
$15 or $30 Stampin' Up! Order
Please RSVP if you are going so I can have materials for you ;)
Wednesday April 25, 2012
6:30pm-9:00pm
Stockton Panera (Trinity Parkway)
$15 or $30 Stampin' Up! Order
Please RSVP if you are going so I can have materials for you ;)
 |
Monday, April 23, 2012
Keep in Mind My May Classes
Photos to Come:)
Photos to Come:)
Butterfly Madness- Wednesday May 2 6-9pm @ Panera
Cost-$15.00 or place a $30 Stamp Order/ 4 Cards
Cost-$15.00 or place a $30 Stamp Order/ 4 Cards
Cupcake Celebration- Wednesday May 16- 6:30-9pm @
Panera
Cost-$15.00 or place a $30 Stamp Order/ 5 Cards
Cost-$15.00 or place a $30 Stamp Order/ 5 Cards
Fancy Flower- Saturday May 26- 2pm-5pm @ Panera
Cost-$15.00 or place a $30 Stamp Order/ 5 Cards
Cost-$15.00 or place a $30 Stamp Order/ 5 Cards
Friendship
I was going through a box yesterday and I found this
card. It was made at my friend Nicole’s
house. When I made this card I remember
thinking, wow I can’t believe people actually hand cut around these
stamps! We also stamped the flower inside, but mine is not lined up so I did not show the picture :) Looking back at this card now my
thought is "Do I buy the stamp set before it retires?!?"
I love the way it looks on the card.
The colors Nicole choose did not hurt the look of the card either ;)
 |
| Stampin’ Up! Stamps: Vintage Vogue |
Sunday, April 22, 2012
Baby Love
This is the invitation and favor for my friend Megan's Baby Shower. I wanted it be different from the Match Matchy shower since most of the people going to both are from work. Originally my friend was going to with with a black and white pattern (thus the black and white theme). At the time we did not know if it was a girl or boy so I went with a neutral red ;) I loved how the start came out. I cant wait to get to the shower now!!! I will post a picture after the shower to show how everything came together!!!
 |
| Stampin Up! Die: Milk Carton Die Punch: Small Heart Embellishment: Clothes Pin Cricut: New Arrival- Lady |
Saturday, April 21, 2012
Uncle David
I made this card to send to my cousins last week after the passing of
their dad (and my uncle David). I wanted
something that was a little more subdued in colors, but not sad. When I found this paper I knew it was exactly
what I was looking for in a background. Then I decided to punch the cream paper
using the Eyelet Boarder to give it a softer look. Then I used the Language of Friendship bird
as my main design. I realized that since
the bird, wing and twig are all on the same stamp the build a bird punch would
have helped to make the card a little cleaner.
I had to color each part with a pen and then make sure the stamp is
clean to do the next layer. I also would
like the punch because the wing could have been layered with a dimensional. Then I added the sediment on the Decorative
Label. To finish it off I distressed the
edges of the label and puffed it to stand out.
 |
Stampin’ Up!
Punch: Eyelet Boarder, Decorative Label (needed Build a Bird) Stamps: Language of Friendship & Whimsical Words |
Friday, April 20, 2012
Matchy Matchy
I love setting a theme for a baby shower that is based on something that is in the room or that the mom loves. This baby shower was based on Erin's baby bedding. I was so excited when I fould paper and a pattern that would match her baby room! This flower came off his bedding checked center and all :) In the center is her invite!!! On the left is the XL Bitty Box from Stampin Up! It was so much fun to put together the box and put the invite flower on the top. On the right is the inside of the box. The box holds 4 Hershey Nuggets too! Each Nugget is wrapped with a "It's a Wrap" Stamp on each lable. The stamp says "Thanks SO Much" in pink. Thanks Erin for trusting me with your shower!
 |
| Stampin Up! Materials Die Cut: XL Bitty Box Stamp Set: It's a WrapMatchy Matchy |
Thursday, April 19, 2012
Simple Punch
This was a goodie bag I made for a good friend! I knew I wanted to give her a cute treat bag, but the Decorative Label punch made it look all fancy! I have to say I am so glad I choose to get this punch! It makes a simple little gift easy and well cute ;)
 |
| Stampin' Up! Punch: Decorative Label |
Wednesday, April 18, 2012
New Arrival
Every year I order caterpillars for my class! I have to say there is something about having them in the classroom! It is like a little bit of the outdoors inside. After putting all of them in their own containers, I gave the kids a chance to name them. Let me just say I was amazed at the names they came up with. You have to check them out for a good laugh (or two)! I will post pictures along the way so that you can have a little nature on your computer too!
.JPG)
.JPG)
.JPG)
Monday, April 16, 2012
Owl Baby
There is so much to say about this card! The first is to say thank you to my old roommate and craft buddy Andrea! (She and her sister have a very cute blog http://teehee4two.blogspot.com/ as well) When I said I wanted to start working with Stampin' Up she made me a few fun cards and this was one of the cards! She is a big owl fan so I was not surprised to see that there was an owl, even on a baby card. I have to admit that before I got this card I had not thought to buy this set and now I really want it! She started with embossing her pink paper with a texture plate and her Big Shot. After that she attached the boarder. On a piece of white paper she stamped the cage and the owl. Next she stamped baby and punched it out with the jewelry tag. It was attached and blinged out with a jewel at the top. Her card was topped off with the welcome baby stamp at the bottom! Oh so cute!!!
 |
| Stampin Up! Stamps: Aviary, Short and Sweet & Tiny Tags punches: Scallop Trim Boarder & Jewelry Tag
Texturz Plate: Background 1
|
Sunday, April 15, 2012
Packed for . . . FUN!!!
I have to admit when I first saw this Packed for set I thought how dumb. I thought it was a bunch of tiny little stamps. Then when I realized it was one big stamp I was so confused. "What do you do with this stamp?" I thought. After going to Stamp Camp I saw a few different ways to make cards with this set. Once I got started I had so much fun! I found ideas all over on line and then changed them to fit what I was wanting the card to look like for me. There are so many different ways to play with this set it is amazing!!!
 |
| Stampin UP! Materials Stamp Set: Delightful Dozen, Packed for Mom, Packed for Dad, Packed for Baby, and Packed for Birthday Punches: Decorative, any Circle Punch, any Square Punch Misc: Libary Clips (on dad's card), Dimentionals, sponge, Jewel (on mom's purse) |
Saturday, April 14, 2012
She's Having Little Lady
The theme of Cyndee's baby shower was "She's Having a Little Lady". So I thought that the ladybugs should be on everything! In the center is the invite. Inside is the information for the shower. On the right was the favor. This paper tube holds mini chocolate bars. In the center is the decoration from the flower pots. Inside the pot I had a few of the ladybugs attached to black wire to make them float with the flowers. I had so much fun! Thank you Cyndee for letting me play with the theme ;)


Wednesday, April 11, 2012
Wedding Craftin'
I am out of town for vacation but I have talking to my friend Nicole about her wedding so I thought this card was fitting! This is another Stamp Camp card! This card was designed by my good friend Nicole. She has more ideas that anyone else I know! For this card we embossed our card using the Big Shot and Textured Stripes embossing folder. After it was embossed we used the 2 1/2 Circle to punch a hole in the top of the card. We attached it using dimensionals on each corner to help raise it up. Then I used the "Happy I Do Day" stamp and placed it in the center on the card. After this it was time to attach the decorations. We used the bird builder punch to cut the sprigs for the card.Now for the pink ;) Nicole said we would hate her after this part, but I thought it was just like working in the classroom. You will take your pink and roll it onto a pencil or paint brush. Then hold it for a few seconds so it can set the shape. I attached a bit of adhesive to he paper and set the shape I wanted and glued it onto the card. The jewels were placed in the center to add a little sparkle. To top off the cad we added a little sparkle to the bling on the ring! Super cute! Thanks Nicole for all of the crafty ideas on this card!!!
 |
| Stampin' Up! Products Punches- 2 1/2 Circle and Bird Builder (sprig) Stamps- Word Play (Happy I Do Day) Die Cut- Textured Stripes embossing folder Misc- Jewels, Dimensionals |
Monday, April 9, 2012
Craftin' with Tea
I have to start with yes, I do often craft with tea of some sort. Sometimes it is a warm cup but usually the Starbucks cup is filled to the rim with iced tea. When I saw there two sets I knew I had to have them and do a class using them. Actually they inspired the upcoming women's ministry coffee house event at church too! Wow all in a set of stamps. Ok back to the cards, I wanted to make a set of cards that would work for any occasion. I have to thank Charlette (http://charlettescreativecorner.blogspot.com/) for allowing me to play with her stamps before mine came in. I had to take 2 pictures to help show the cards.


 |
| Stampin' Up! Materials Punches: Decorative Label,, Modern Label, 1 3/4' Circle, 1 3/8' Square Stamps: Morning Cup (look hand drawn), Take A Sip Roller and Tea Shoppe |
Sunday, April 8, 2012
Happy Easter
Happy (late) Easter!!! I made this card at a recent Stamp Camp! There were so many neat women there and I was blessed to be a part of that day! I had to share this card because the woman who demonstrated it was extra crafty!!! We started by using the ticket corner to cut the corners off the green and white back ground pages. After cutting the corners we attached one on top of the other. Then it was onto the eggs. We cut each egg color using both the 1 3/8 circle punch and the extra large oval punch. Once you have the cut ovals and circles cut each in half. This is what will give your egg its "egg" shape. To cover the seam we attached a ribbon. The eggs were topped off with a flower from the Itsy Bitsy Shapes punches and a jewel. We finished off the whole card with a "Happy Easter" stamp! I loved it so much I had to share!!!
 |
| Stampin' Up! Materials Punches: Ticket Corner, 1 3/8 Circle, Extra Large Oval, Itsy Bitty Shapes Punch Pack Stamps: Everybunny (Happy Easter) Die Cuts- Edgelets Ribbon & Jewels |
Saturday, April 7, 2012
Celebrate Spring
This card was on my blip made as an Easter Card for a few family members, two being my grandparents. My mom & dad were visiting themso my cards had to be done early. I saw the original card on a blog I as looking at. I thought I would change it to make it my own! I used the Blossom Bouquet punch for the two layers of the flower. I attached the first flower flat and then used a puff dot to raise the top layer of the flower. Then I used the Modern Label punch to punch out the green leaves. I punched them and then folded them in half to make the bottom of the flowers. I also backed the picture with blue to make it look like sky and rounded the corners with the Ticket Corner punch! I added a little Happy Easter stamp inside on the Decorative Label.
 |
| Stampin' Up! Materials Punches- Modern Label, Blossom Bouquet, Ticket Corner, and Decorative Label (inside) Stamps- Delightful Dozen (Happy Easter- inside) |
Thursday, April 5, 2012
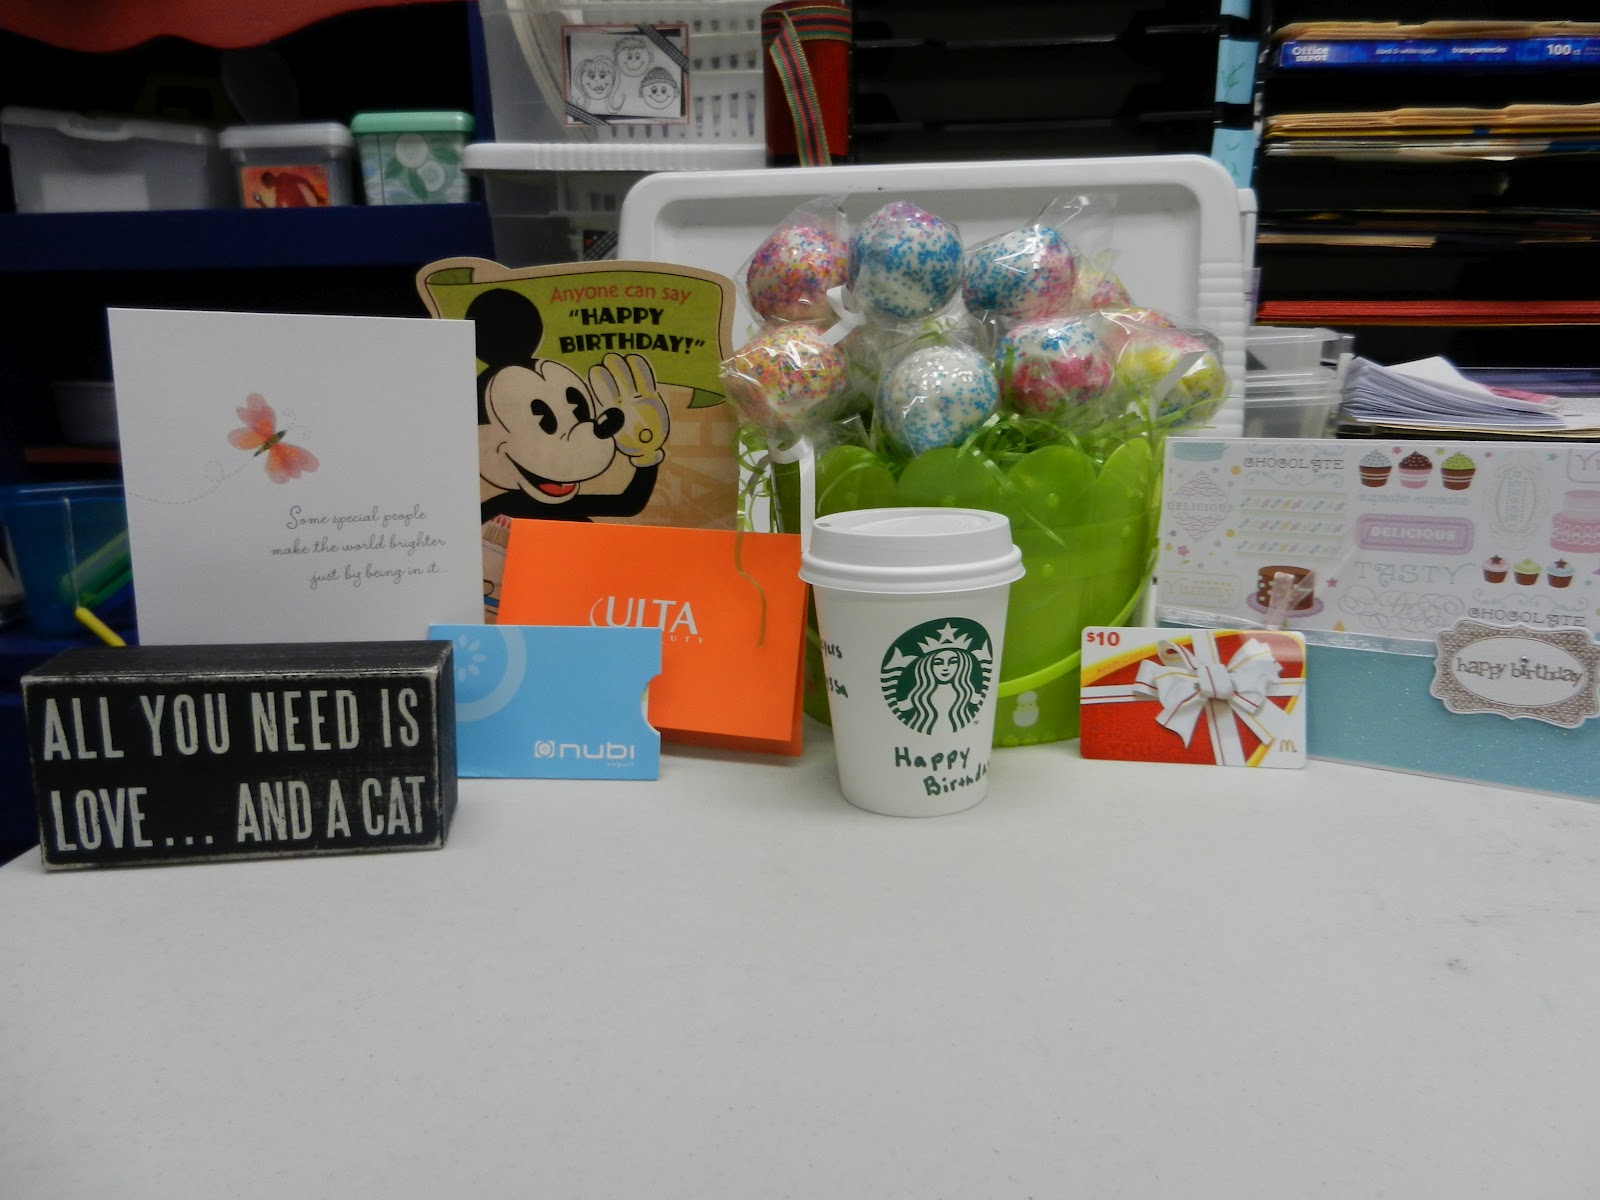
Birthday Craftin'
I am so blessed to have crafty families at my school! Another teacher got cake pops on Monday for her birthday and I joked with he saying I hope to get those on my birthday! Well this morning look what showed up! CAKE POPS, and CUTE CARDS! I love when people teach me new crafty things!!! And they say I am creative, look at them go!
 |
| School Birthday :) |
Subscribe to:
Posts (Atom)