Showing posts with label Love. Show all posts

Tuesday, June 11, 2013

Woohoo

This was Nicole's card.  She always likes to give us a challenge with her cards.  I always love crafting with her because it is fun to hear her passion for crafting come out in her explanation ;)  It's also fun to hear her say a million times how sorry she is that her card needs so much explanation!  to checkout her crafting click on her name and enjoy!  Thanks Nicole!!!
Stampin' Up:
Punch: Owl Builder
Stamps: Woodgrain, Hugs & Kisses

Saturday, May 18, 2013

Thanks a Million

I am sad to say it took this stamp set being on the retired list for me to pull it off the shelf.  This card was a copy from Pintrest. I changed the background to brown and the stamp and boarder from black to blue.  I have to admit it is mostly because I could not find the black stamp pad.  I love how cute she looks with her boots.  So Thanks a Million for stopping by!
Stampin' Up!
Punches: Pietite Curly Label
Stamps: Million Dollar Moments

Wednesday, February 6, 2013

Be Mine

I have seen a few banners like this one on Pinterest so I wanted to make on of my own for Valentines Day. It was so simple. I started with the hearts from an old deck of cards.  This deck was missing cards so it was a perfect recycled project.  I used my 3 hole punch and punched the corner of the card at the bottom of the punch. Then I flipped it over and punched the other corner in the same way. Repeat for each card. Now that you have all of your cards ready Lay them out on a table and string them onto your ribbon.  Once they are all on space them apart so there is enough room for 3 to 5 ribbons or pieces of yarn in between.  I then used my Cricut to cut out the words BE MINE.  I found they needed to be cut in a height of 2 inches.  Attach the letters, then hang it up and you are done ;)  Oh ya if you flipped the banner over it is the paying card side.  Like I said I was missing cards so I mixed up the numbers and centered them between the valentine couple (King and Queen).  It would be the perfect banner for a valentine themed game night!
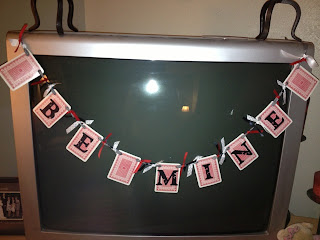
Cricut: Gypsy Font

Saturday, February 2, 2013

Love Notes

I have seen a lot of great ideas for leaving notes to your loved ones for the days leading up to Valentines Day. So I thought I would make my own 14 reasons I love you for my husband.  I cut out the basic shape with a label framelit.  Then I stamped the day in the center and sponged the edge with red :)  I just love it!

Stampin' Up!
Stamps: Memorable Moments
Die: Label  Framelits

Thursday, January 31, 2013

Love Cookies

I wanted to make some cute cookies for my Women's Ministry team.  When I was at Cotstco I found these short bread cookies and was ready for the project.  I knew I wanted them simple, but cute.  So I embossed hearts onto the top strip.  Then I used the love stamp and punched it out and I was done.  So smiple!!!
Stampin Up:
Stamps: You are Loved
Punches: XL Decorative Label
Big Shot:  Heart Folder

Wednesday, January 16, 2013

Love U

 My friend Andrea made this really cute card at our shoe box card night.   There were so many cards and I wish I had time to make them all.  Being that Andrea was my college roommate I had to start with her cards ;)  Not to mention how much I loved this card!
Stampin' Up!
Punches: Small Heart, Large Heart
Die Cuts: Alphabet, Woodgrain Folder, Label Framelit,
Paper Piecer

Tuesday, January 15, 2013

Pinwheel Hearts

Here is Andrea's last card. I love the use of the pinwheel!
Stampin' Up!
Stamps: Hearts a Flutter
Die Cuts: Pinwheel, Fashionable Hearts- Embosslits, Edgelits- Accents,
Cloud Folder,Heart Framelit, Hearts a Flutter- Framelit

Love Window

I have to start by saying there were so many cute cards, but I did not know who designed most. You can visit Andrea and Nicole's blog at teehee4two.blogspot.com to see more great ideas! Today's card was made by Nicole. She is one of my super crafty friends and happens to be Andrea's sister. I just loved how simple this card was. Inside the o window is a silver heart. I loved it. If you have the peek-a-boo die they could all be made windows with valentine surprises inside :)
Stampin' Up!
Punches: Small Heart, Square, Scallop Square
Stamps: Morning Post, Fabulous Phrases
Die Cuts: Top Note, Peek A Boo Frames
Folders:


Butterfly Love

This is another great card Andrea made for our card night. You can visit her blog at teehee4two@blogspot.com
Stampin' Up!
Punches: Small Butterfly
Die Cuts: Hearts Adorning Accents, Alphabet


Thursday, January 10, 2013

Be Mine Too

This was my FAVORITE of my three cards.  It took me a while to figure out how to balance the hearts on the page.  I put one at the bottom in the pattern but it looked a little funny with the scallop so I left it off.  I just liked the hearts inside of the honeycomb.  My next card I think I might have just hearts in different colors without the scallop in the corner.
Stampin' Up!
Punches: 1 1/4" Scallop Circle, 3/4" Circle, Small Heart
Stamps: Mixed Medley
Big Shot: Honey Comb Folder

Be Mine

This is card #2 for my craft night with the ladies.  Oh how I love this honeycomb print. I wanted to do something a little bright and fun, but when I started on this card I liked the simple look to it!  As much as I liked this card I still wanted to make a funky one so tomorrow I will post the funky fun heart card :)
Stampin' Up!
Punches: 1 1/4" Scallop Circle, 3/4" Circle
Stamps: Mixed Medley
Big Shot: Honey Comb Folder

Wednesday, January 9, 2013

Whale Love

Tonight I made a card for a craft night on Friday. You know when you have great hopes and is comes out sort of how you thought. Well that is this card. I has fun making it with all new products, but I can't wait to see how people change it up. I might get some great ideas for change :)

Stampin' Up!
Punches: Petite Curly Label
Stamps: Ciao Baby!
Big Shot: Cloudy Day Folder, Woodgrain Folder

Saturday, May 12, 2012

Love ... is Like a Butterfly

I have to say I love this card.  I don't know if it because of the colors or the look of the card!?!  This was the easiest card with an amazingly simple look!  I started by punching the cream with the XL Decorative Label punch.  Then I centered the antenna stamp on the label.  Then I punched the espresso paper with the butterfly punch.  To top off the butterfly I used the Butterfly Prints writing butterfly.   I stamped and cut around the stamp so you could still see the brown background butterfly.  I attached it just in the center so the wings could flutter.  To finish it off I used the sediment from the Butterfly Prints set. Since I have made a few other in different colors, but I still like the brown colors ;)  Have fun!
Punch: XL Decorative Label, Butterfly
Stamps: Butterfly Prints